
Weight & Biases(wandb) 사용법(wandb 설치 및 설명)
10 Jun 2020 | wandb usage목차
이번 글에서는 Weight & Biases라고 하는, machine learning을 위한 개발 tool을 소개하고자 한다.
Tensorflow의 Tensorboard와 비슷한데, 이 도구는 tensorflow나 pytorch 등 여러 flatform에서 사용가능한 것이 특징이다. Dashboard, Sweeps, Artifacts 기능을 지원한다.
이 글에서는 PyTorch를 기준으로 설명한다. 그러나, Tensorflow에서의 사용법도 크게 다르지 않으니 참고하자.
초기 설정
먼저 홈페이지에 들어가서 회원가입을 하자. Google이나 Github ID로 가입할 수 있다.
그리고 wandb library를 설치한다.
pip install wandb
다음으로 github 로그인할 때처럼 wandb에도 로그인을 해야 한다. 명령창에 다음을 입력하자.
wandb login

# 결과:
wandb: You can find your API key in your browser here: https://app.wandb.ai/authorize
wandb: Paste an API key from your profile and hit enter:
해당 링크를 들어가서 API key를 복사한 다음 명령창에 붙여넣기하자.
그럼 로그인이 완료된다.
Successfully logged in to Weights & Biases!
Quickstart
Keras
다음 tutorial을 참고해 readme를 따라 그대로 실행해 보자.
git clone http://github.com/cvphelps/tutorial
cd tutorial
pip install -r requirements.txt
wandb signup # 이렇게 해도 가입 가능하다.
wandb init
그러면 현재 프로젝트를 설정할 수 있다. 맨 처음에는 아무 프로젝트도 없기 때문에 프로젝트 이름을 설정하고 새로 만들 수 있다.
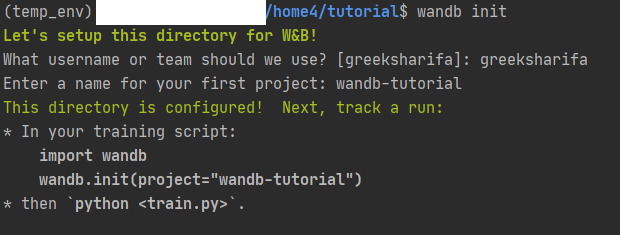
이미 실행한 적이 있다면 프로젝트 목록 중에서 하나를 선택할 수 있다.

그리고 홈페이지를 확인해보면 프로젝트가 하나 생긴 것을 확인할 수 있다.

이제 튜토리얼을 따라 실행해 보자.
python tutorial.py
# 결과:

wandb: Tracking run with wandb version 0.9.1
wandb: Run data is saved locally in wandb/run-20200610_071808-2yir0lw7
wandb: Syncing run fiery-river-1
wandb: View project at https://app.wandb.ai/greeksharifa/wandb-tutorial
wandb: View run at https://app.wandb.ai/greeksharifa/wandb-tutorial/runs/2yir0lw7
wandb: Run `wandb off` to turn off syncing.

Train on 10047 samples, validate on 10000 samples
Epoch 1/8
10047/10047 [==============================] - 2s 235us/step - loss: 0.9085 - accuracy: 0.6605 - val_loss: 0.5802 - val_accuracy: 0.7800
Epoch 2/8
10047/10047 [==============================] - 2s 224us/step - loss: 0.5756 - accuracy: 0.7850 - val_loss: 0.5094 - val_accuracy: 0.8113
...
Epoch 8/8
10047/10047 [==============================] - 4s 379us/step - loss: 0.3548 - accuracy: 0.8686 - val_loss: 0.3881 - val_accuracy: 0.8606

wandb: Waiting for W&B process to finish, PID 15848
wandb: Program ended successfully.
wandb: Run summary:
wandb:      _timestamp 1591773513.0287454
wandb:           epoch 7
wandb:           _step 7
wandb:            loss 0.3548142489680274
wandb:    val_accuracy 0.8605999946594238
wandb:        _runtime 24.4707293510437
wandb:        accuracy 0.8686174750328064
wandb:        val_loss 0.3880709020137787
wandb:   best_val_loss 0.3880709020137787
wandb:      best_epoch 7
wandb: Syncing 5 W&B file(s), 9 media file(s), 0 artifact file(s) and 1 other file(s)
wandb:
wandb: Synced fiery-river-1: https://app.wandb.ai/greeksharifa/wandb-tutorial/runs/2yir0lw7
그러면 이제 프로젝트 내에서 임의로 지정된 실행 이름으로 클라우드에 동기화가 된다. 브라우저에서 확인해보면 1 run이라고 표시된 것을 볼 수 있다. 눌러보자.
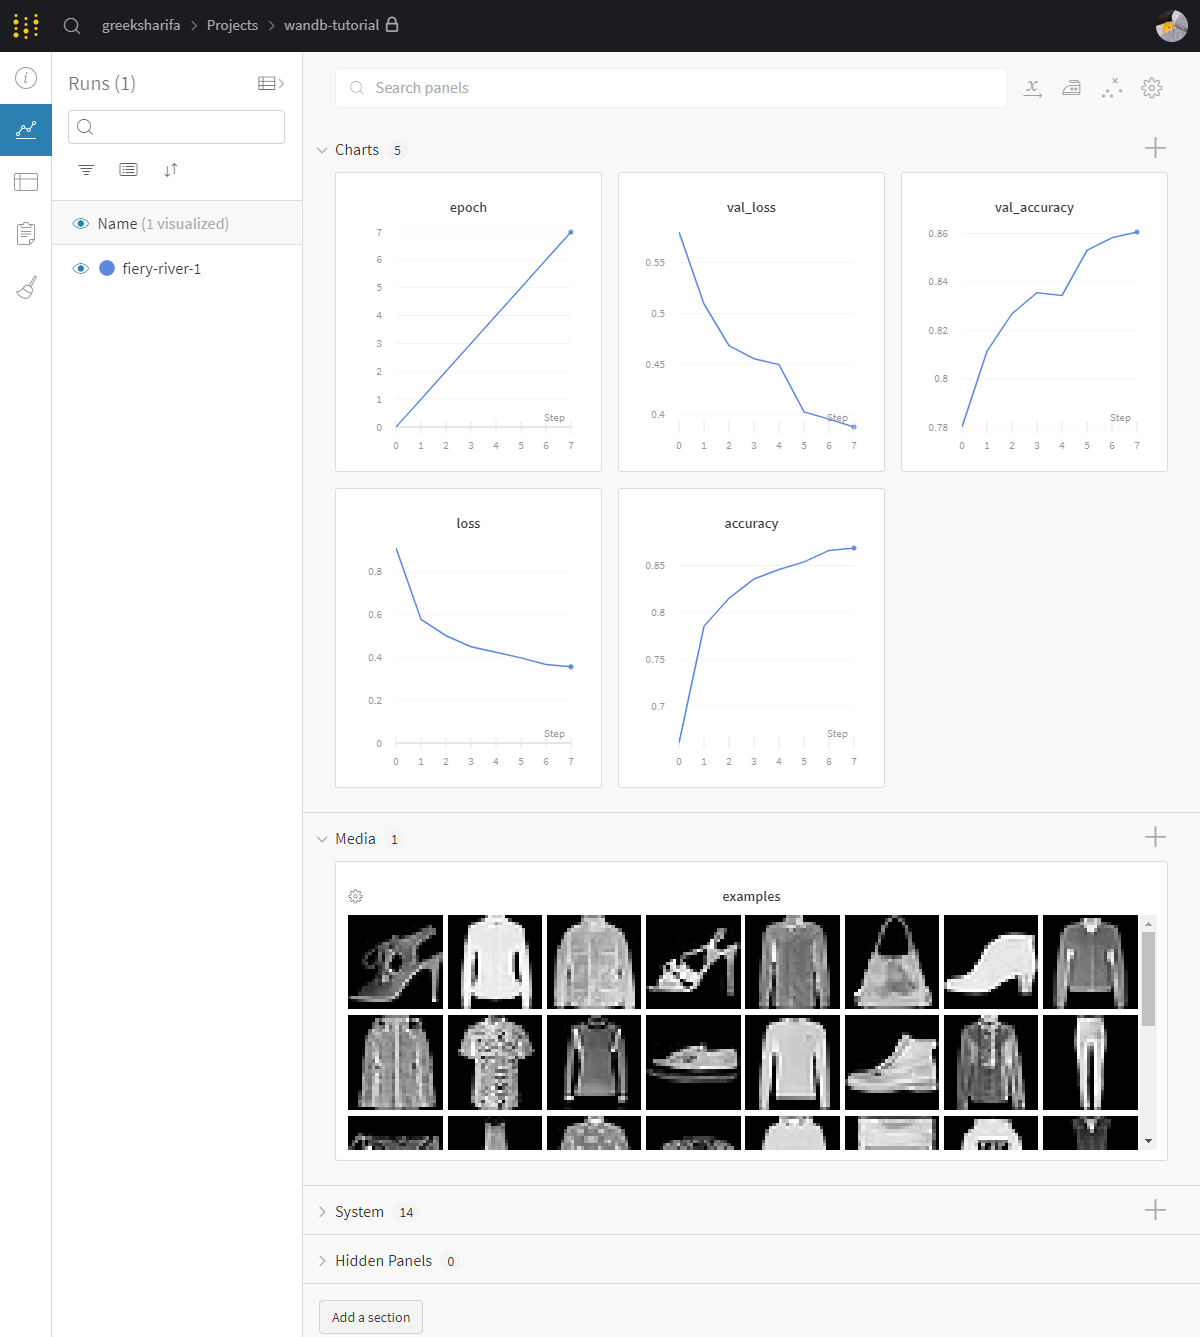
그럼 대충 위와 같은 화면이 나온다. 편리하다
사실 위의 코드는 keras를 사용한 것이다. PyTorch를 살펴보자.
PyTorch
예시로 Pytorch tutorial 중 mnist classification 모델을 가져와서 설명한다. 링크에서 git clone하여 받아온 후 mnist 디렉토리에서 작업을 시작하자.
원래 코드는 다음과 같다.
from __future__ import print_function
import argparse
...


class Net(nn.Module):
    ...


def train(args, model, device, train_loader, optimizer, epoch):
    ...


def test(model, device, test_loader):
    model.eval()
    test_loss = 0
    correct = 0
    with torch.no_grad():
        for data, target in test_loader:
            ...

    test_loss /= len(test_loader.dataset)

    print('\nTest set: Average loss: {:.4f}, Accuracy: {}/{} ({:.0f}%)\n'.format(
        test_loss, correct, len(test_loader.dataset),
        100. * correct / len(test_loader.dataset)))


def main():
    # Training settings
    parser = argparse.ArgumentParser(description='PyTorch MNIST Example')
    ...
    args = parser.parse_args()
    use_cuda = not args.no_cuda and torch.cuda.is_available()

    torch.manual_seed(args.seed)

    ...

    model = Net().to(device)
    optimizer = optim.Adadelta(model.parameters(), lr=args.lr)

    ...
    if args.save_model:
        torch.save(model.state_dict(), "mnist_cnn.pt")


if __name__ == '__main__':
    main()
wandb를 사용하기 위해 import하자.
import wandb
main() 함수의 맨 앞부분에 다음 코드를 추가한다.
wandb.init()
args 변수 선언부 밑에 다음 코드를 추가한다.
wandb.config.update(args)
model 선언부 다음에 다음 코드를 추가한다.
wandb.watch(model)
이제 test() 함수를 다음과 같이 바꿔주자.
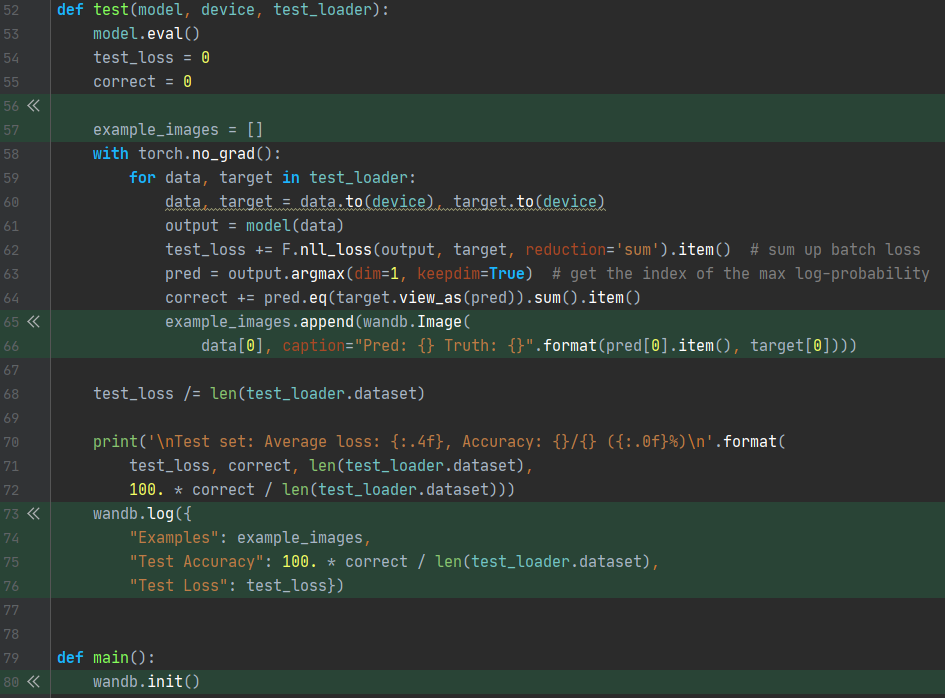
전체 코드는 다음과 같다.
from __future__ import print_function
import argparse
...
import wandb

class Net(nn.Module):
    ...


def train(args, model, device, train_loader, optimizer, epoch):
    ...

def test(model, device, test_loader):
    model.eval()
    test_loss = 0
    correct = 0

    example_images = []
    with torch.no_grad():
        for data, target in test_loader:
            ...

    test_loss /= len(test_loader.dataset)

    print('\nTest set: Average loss: {:.4f}, Accuracy: {}/{} ({:.0f}%)\n'.format(
        test_loss, correct, len(test_loader.dataset),
        100. * correct / len(test_loader.dataset)))
    wandb.log({
        "Examples": example_images,
        "Test Accuracy": 100. * correct / len(test_loader.dataset),
        "Test Loss": test_loss})


def main():
    wandb.init()
    # Training settings
    parser = argparse.ArgumentParser(description='PyTorch MNIST Example')
    ...
    args = parser.parse_args()
    use_cuda = not args.no_cuda and torch.cuda.is_available()

    wandb.config.update(args)
    ...

    model = Net().to(device)
    optimizer = optim.Adadelta(model.parameters(), lr=args.lr)
    wandb.watch(model)
    ...

    if args.save_model:
        torch.save(model.state_dict(), "mnist_cnn.pt")


if __name__ == '__main__':
    main()
그리고 run 해보자.
python main.py
명령창 마지막에 표시된 링크를 타고 가면 다음과 같이 깔끔하게 표시되는 화면을 볼 수 있다.
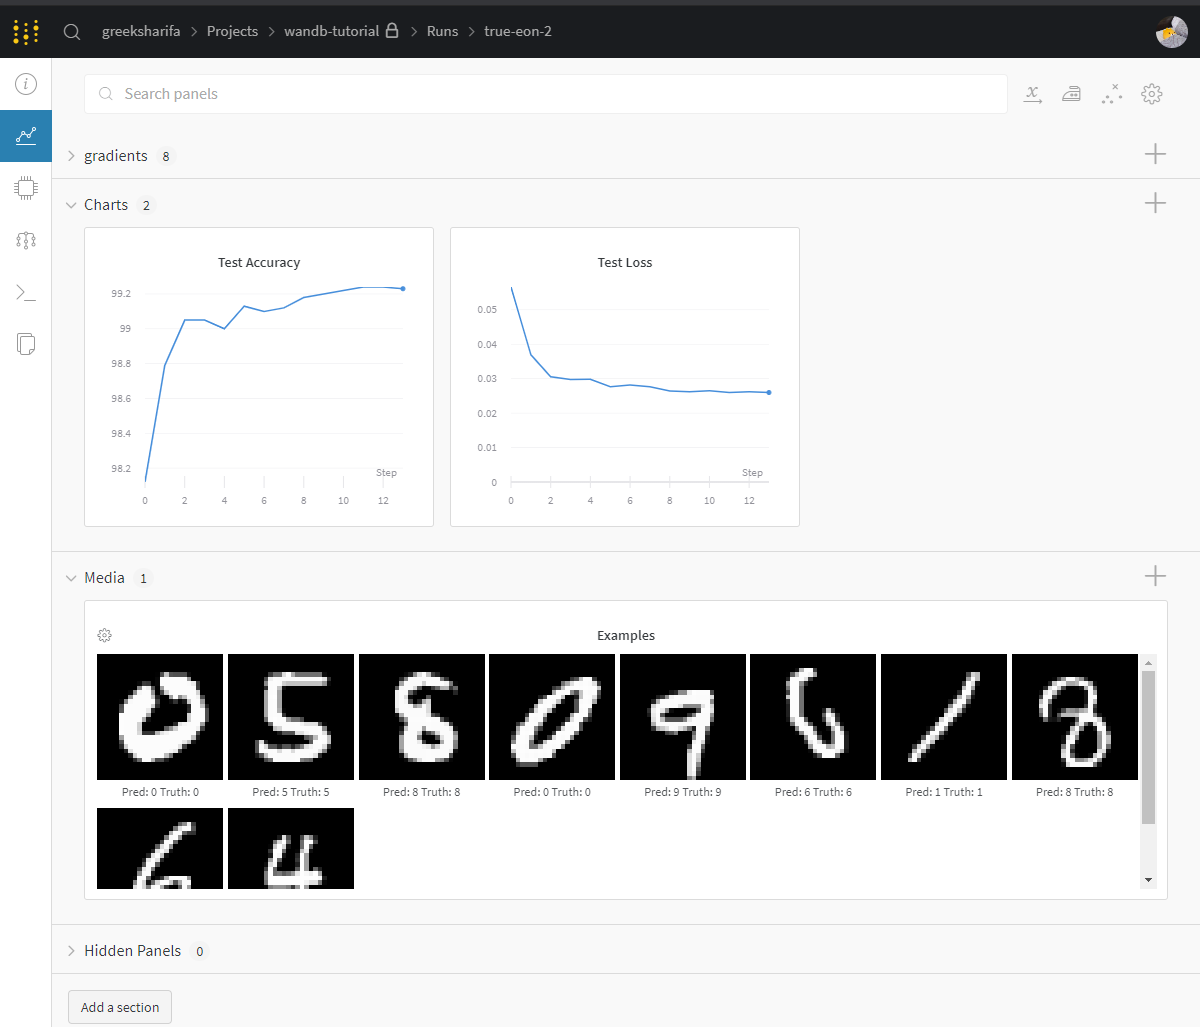
프로젝트에 wandb를 추가하는 방법은 대략 위와 같다.
이제 PyCharm 등에서 working tree를 살펴보면 wandb 디렉토리가 생성되어 있고, 여기에 log들이 저장되고 동시에 cloud에도 동기화된다. 내부에는 한 번의 실행당 하나의 sub-디렉토리가 있다.
이제 자세한 설정 방법들을 알아보자.
wandb.init()
명령창에서 wandb init을 실행하거나, python 코드 안에 wandb.init()을 추가하면, 현재 실행하는 프젝트를 처음에 지정해 줄 수 있다.
import wandb
wandb.init(project="project-name", reinit=True)
reinit=True 옵션을 주면 실행 시에 init()을 다시 수행한다.
만약 실행 시 LaunchError: Permission denied라는 에러를 본다면 wandb 로그인을 하지 않은 것이다. 여기를 참조하자.
실행 이름 설정
아무 것도 설정하지 않았을 때, 프로젝트 이름 내에서 매 실행당 생성되는 이름은 임의로 지정된다(ex. fiery-river-1, true-eon-2). 실행 이름을 설정하려면 다음과 같이 한다.
import wandb
wandb.init()
wandb.run.name = 'your-run-name'
# generted run ID로 하고 싶다면 다음과 같이 쓴다.
# wandb.run.name = wandb.run.id
wandb.run.save()
오프라인에 로그 기록
만약 인터넷이 연결되지 않는다면 오프라인으로 저장할 수 있다. 코드 맨 앞에 다음을 넣자.
import wandb
import os

os.environ["WANDB_API_KEY"] = YOUR_KEY_HERE
os.environ["WANDB_MODE"] = "dryrun"
YOUR_KEY_HERE에다가 authorize 페이지에서 볼 수 있는 key를 복붙해주자.
그러면 오프라인에 로그가 기록된다. 나중에 온라인에 동기화하고 싶다면 명령창에 다음을 입력한다.
wandb sync wandb/dryrun-folder-name
wandb.config
config를 wandb에 넣어둘 수 있다.
간단히는 다음과 같이 할 수 있다.
wandb.config.epochs = 4
wandb.config.batch_size = 32
# you can also initialize your run with a config
wandb.init(config={"epochs": 4})
효율적으로 쓰고자 하면 다음과 같이 dictionary로 넣어주면 된다.
wandb.init(config={"epochs": 4, "batch_size": 32})
wandb config를 새로 지정하거나, parameter를 일부 또는 전부를 업데이트하려면 다음과 같이 쓸 수 있다.
wandb.config.update({"epochs": 4, "batch_size": 32})
여러분이 python code에서 argparse를 쓰고 있다면 다음 흐름이 적절하다.
wandb.init()
wandb.config.epochs = 4

parser = argparse.ArgumentParser()
parser.add_argument('-b', '--batch-size', type=int, default=8, metavar='N',
                     help='input batch size for training (default: 8)')
args = parser.parse_args()
wandb.config.update(args) # adds all of the arguments as config variables
Tensorflow 등의 다른 흐름은 여기를 참고하자.
wandb.log(dict)
이미지나, accuracy, test_loss 등의 로그를 기록하고 싶다면 wandb.log()를 쓰자.
간단하게 loss 등의 로그를 보고 싶다면 코드에 다음과 같은 형식으로 추가해 주면 된다. 인자는 dictionary type이다.
wandb.log({
        "Test Accuracy": 100. * correct / len(test_loader.dataset),
        "Test Loss": test_loss})
Histogram
wandb.log({"gradients": wandb.Histogram(numpy_array_or_sequence)})
wandb.run.summary.update({"gradients": wandb.Histogram(np_histogram=np.histogram(data))})
Image
이미지는 numpy array나 PIL 등으로 전달할 수 있다. numpy array는 회색조면 마지막 차원은 1, RGB면 3, RGBA이면 4이다.
wandb.log({"examples": [wandb.Image(numpy_array_or_pil, caption="Label")]})
# or
example_images.append(wandb.Image(
                data[0], caption="Pred: {} Truth: {}".format(pred[0].item(), target[0])))
wandb.log({"Examples": example_images})
참고 사이트 목록:
- https://docs.wandb.com/library/log
- https://app.wandb.ai/stacey/deep-drive/reports/Image-Masks-for-Semantic-Segmentation–Vmlldzo4MTUwMw
- https://colab.research.google.com/drive/1SOVl3EvW82Q4QKJXX6JtHye4wFix_P4J#scrollTo=I7sKQuBBgFZ_
Media
wandb.log({"examples": [wandb.Audio(numpy_array, caption="Nice", sample_rate=32)]})
matplotlib.pyplot
matplotlib으로 그릴 수 있는 custom plot들도 wandb log에 기록할 수 있다.
import matplotlib.pyplot as plt
plt.plot([1, 2, 3, 4])
plt.ylabel('some interesting numbers')
wandb.log({"chart": plt})
그런데 이 때 wandb의 내부 동작 과정에서 matplotlib의 제거된 method를 사용하는 경우 에러가 발생하는데, 이 때는 다음과 같이 Image를 이용해주면 된다.
import matplotlib as plt
import seaborn

fig, ax = plt.subplots(figsize=(12, 12))
sns.scatterplot(
    x="x", y="y", hue=df.label.tolist(), legend="full",
    palette="Paired_r",
    data=df)

wandb.log({'plot': wandb.Image(fig)})
wandb를 사용하는 예제는 여기에 많으니 참고하자.