
MMDetection 사용법 1(Quick Run)
30 Aug 2021 | Linux Ubuntu open-mmlab usage목차
- 기본 설명
- 설치
- 간단 실행
- 1. Train predefined models on standard datasets
- 2: Train with customized datasets
- 3: Train with customized models and standard datasets
이 글에서는 MMDetection를 사용하는 방법을 정리한다.
기본 설명
OpenMMLab에서는 매우 많은 최신 모델을 Open Source Projects로 구현하여 공개하고 있다.
2021.08.30 기준 11개의 Officially Endorsed Projects와 6개의 Experimental Projects를 공개하고 있다.
11개 프로젝트의 목록을 아래에 적어 놓았다. 예를 들어 어떤 이미지를 detect하는 모델을 찾고 싶으면 MMDetection에서 찾으면 된다. 대부분 따로 설명하지 않아도 무엇을 하는 모델인지 알 것이다.
- MMCV: Computer Vision
- MMDetection
- MMAction2
- MMClassification
- MMSegmentation
- MMDetection3D
- MMEditing: Image and Video Editing
- MMPose: Pose estimation
- MMTracking
- MMOCR
- MMGeneration
각각의 repository는 수십 개의 모델을 포함한다. 예를 들어 MMDetection은
Supported backbones:
- ResNet (CVPR’2016)
- ResNeXt (CVPR’2017)
- VGG (ICLR’2015)
- HRNet (CVPR’2019)
- RegNet (CVPR’2020)
- Res2Net (TPAMI’2020)
- ResNeSt (ArXiv’2020)
Supported methods:
- RPN (NeurIPS’2015)
- Fast R-CNN (ICCV’2015)
- Faster R-CNN (NeurIPS’2015)
- Mask R-CNN (ICCV’2017)
- Cascade R-CNN (CVPR’2018)
- Cascade Mask R-CNN (CVPR’2018)
- SSD (ECCV’2016)
- RetinaNet (ICCV’2017)
- GHM (AAAI’2019)
- Mask Scoring R-CNN (CVPR’2019)
- Double-Head R-CNN (CVPR’2020)
- Hybrid Task Cascade (CVPR’2019)
- Libra R-CNN (CVPR’2019)
- Guided Anchoring (CVPR’2019)
- FCOS (ICCV’2019)
- RepPoints (ICCV’2019)
- Foveabox (TIP’2020)
- FreeAnchor (NeurIPS’2019)
- NAS-FPN (CVPR’2019)
- ATSS (CVPR’2020)
- FSAF (CVPR’2019)
- PAFPN (CVPR’2018)
- Dynamic R-CNN (ECCV’2020)
- PointRend (CVPR’2020)
- CARAFE (ICCV’2019)
- DCNv2 (CVPR’2019)
- Group Normalization (ECCV’2018)
- Weight Standardization (ArXiv’2019)
- OHEM (CVPR’2016)
- Soft-NMS (ICCV’2017)
- Generalized Attention (ICCV’2019)
- GCNet (ICCVW’2019)
- Mixed Precision (FP16) Training (ArXiv’2017)
- InstaBoost (ICCV’2019)
- GRoIE (ICPR’2020)
- DetectoRS (ArXix’2020)
- Generalized Focal Loss (NeurIPS’2020)
- CornerNet (ECCV’2018)
- Side-Aware Boundary Localization (ECCV’2020)
- YOLOv3 (ArXiv’2018)
- PAA (ECCV’2020)
- YOLACT (ICCV’2019)
- CentripetalNet (CVPR’2020)
- VFNet (ArXix’2020)
- DETR (ECCV’2020)
- Deformable DETR (ICLR’2021)
- CascadeRPN (NeurIPS’2019)
- SCNet (AAAI’2021)
- AutoAssign (ArXix’2020)
- YOLOF (CVPR’2021)
- Seasaw Loss (CVPR’2021)
- CenterNet (CVPR’2019)
- YOLOX (ArXix’2021)
를 포함한다.(많다)
이 글에서는 MMDetection 중 Faster-RCNN 모델을 다루는 법만 설명한다. 나머지도 비슷한 흐름을 따라갈 듯 하다.
설치
Prerequisites
- Linux or macOS (Windows is in experimental support)
- Python 3.6+
- PyTorch 1.3+
- CUDA 9.2+ (If you build PyTorch from source, CUDA 9.0 is also compatible)
- GCC 5+
- MMCV
공식 문서에서 Docker를 통해 사용하는 방법도 안내하고 있는데, 현재 Docker의 환경은 다음과 같다.
- Linux
- Python 3.7.7
- PyTorch 1.6.0
- TorchVision 0.7.0
- CUDA 10.1 V10.1.243
- mmcv-full 1.3.5
자신이 사용하는 환경이 복잡하다면 얌전히 Docker를 쓰는 편이 낫다..
설치 방법은
에 나와 있으니 참고하자. Docker 쓰면 별다른 에러 없이 바로 구동 가능하다.
Docker 설치방법 안내에 나와 있지만, data/ 디렉토리는 자신이 사용하는 환경에서 데이터를 모아놓는 디렉토리에 연결해놓으면 좋다.
docker run --name openmmlab --gpus all --shm-size=8g -it -v {DATA_DIR}:/mmdetection/data mmdetection
그리고 설치 방법에 나와 있는 것처럼 repository를 다운받아 놓자.(Docker는 이미 되어 있다)
git clone https://github.com/open-mmlab/mmdetection
cd mmdetection
Docker를 쓰기로 했으면 Docker 내에서 다음 명령어를 입력해서 설치를 진행하자.
apt-get update
apt-get install git vim wget
간단 실행
High-level APIs for inference
우선 checkpoints 디렉토리를 만들고 다음 모델 파일을 받자.
현재 worktree는 다음과 같다.
- 참고: 공식 문서에는 config 파일을 따로 받아야 할 것처럼 써 놨지만 repository에 다 포함되어 있다.
mmdetection
├── checkpoints
|   ├── faster_rcnn_r50_fpn_1x_coco_20200130-047c8118.pth
├── configs
│   ├── faster_rcnn
│   │   ├── faster_rcnn_r50_fpn_1x_coco.py
│   │   ├── ...
├── data
├── demo
|   ├── demo.jpg
|   ├── demo.mp4
|   ├── ...
├── mmdet
├── tools
│   ├── test.py
│   ├── ...
├── tutorial_1.py
├── ...
tutorial_1.py 파일을 만들고 다음 코드를 붙여넣자.
- 참고: 공식 문서 코드에서는 파일명이 test.jpg 처럼 자신이 직접 집어넣어야 하는 파일들로 되어 있지만, 이건 어차피 튜토리얼이니까 기본 제공되는 demo 폴더 내의 이미지와 비디오 파일을 쓰자.
from mmdet.apis import init_detector, inference_detector
import mmcv

# Specify the path to model config and checkpoint file
config_file = 'configs/faster_rcnn/faster_rcnn_r50_fpn_1x_coco.py'
checkpoint_file = 'checkpoints/faster_rcnn_r50_fpn_1x_coco_20200130-047c8118.pth'

# build the model from a config file and a checkpoint file
model = init_detector(config_file, checkpoint_file, device='cuda:0')

# test a single image and show the results
img = 'demo/demo.jpg'  # or img = mmcv.imread(img), which will only load it once
result = inference_detector(model, img)
# visualize the results in a new window
model.show_result(img, result)
# or save the visualization results to image files
model.show_result(img, result, out_file='demo/demo_result.jpg')

# test a video and show the results
video = mmcv.VideoReader('demo/demo.mp4')
for frame in video:
    result = inference_detector(model, frame)
    model.show_result(frame, result, wait_time=1)
python tutorial_1.py로 실행해보면 GUI가 지원되는 환경이면 결과가 뜰 것이고, 아니면 demo/demo_result.jpg를 열어보면 된다.
Demos(Image, Webcam, Video)
이미지 한 장에 대해서 테스트하는 경우를 가져왔다. 나머지 경우는 공식 문서에서 보면 된다.
python demo/image_demo.py \
    ${IMAGE_FILE} \
    ${CONFIG_FILE} \
    ${CHECKPOINT_FILE} \
    [--device ${GPU_ID}] \
    [--score-thr ${SCORE_THR}]
예시:
python demo/image_demo.py demo/demo.jpg \
    configs/faster_rcnn/faster_rcnn_r50_fpn_1x_coco.py \
    checkpoints/faster_rcnn_r50_fpn_1x_coco_20200130-047c8118.pth \
    --device cuda:0
Test existing models on standard datasets
COCO, Pascal VOC, CityScapes(, DeepFashion, Ivis, Wider-Face) 등의 표준 데이터셋의 경우 바로 테스트를 수행해 볼 수 있다. 데이터를 다운받고 압축을 풀어 아래와 같은 형태로 두면 된다.
mmdetection
├── mmdet
├── tools
├── configs
├── data
│   ├── coco
│   │   ├── annotations
│   │   ├── train2017
│   │   ├── val2017
│   │   ├── test2017
│   ├── cityscapes
│   │   ├── annotations
│   │   ├── leftImg8bit
│   │   │   ├── train
│   │   │   ├── val
│   │   ├── gtFine
│   │   │   ├── train
│   │   │   ├── val
│   ├── VOCdevkit
│   │   ├── VOC2007
│   │   ├── VOC2012
COCO-stuff 데이터셋 등 다른 일부 데이터셋 혹은 추가 실행 옵션의 경우 공식 문서를 참조하면 된다.
가장 기본이 되는 1개의 GPU로 결과를 확인하는 코드는 아래와 같다. 아무 키나 누르면 다음 이미지를 보여준다.
python tools/test.py \
    configs/faster_rcnn/faster_rcnn_r50_fpn_1x_coco.py \
    checkpoints/faster_rcnn_r50_fpn_1x_coco_20200130-047c8118.pth \
    --show
생성된 이미지를 보여주지 않고 저장하는 코드는 아래와 같다. 그냥 output directory를 지정하기만 하면 된다.
- 참고: 공식 문서에는 config 파일 이름이 조금 잘못된 것 같다.
python tools/test.py \
    configs/faster_rcnn/faster_rcnn_r50_fpn_1x_coco.py \
    checkpoints/faster_rcnn_r50_fpn_1x_coco_20200130-047c8118.pth \
    --show-dir faster_rcnn_r50_fpn_1x_results
COCO 말고 다른 데이터셋을 쓰거나, Multi-GPU 등을 사용하는 경우는 공식 문서를 참조하면 된다.
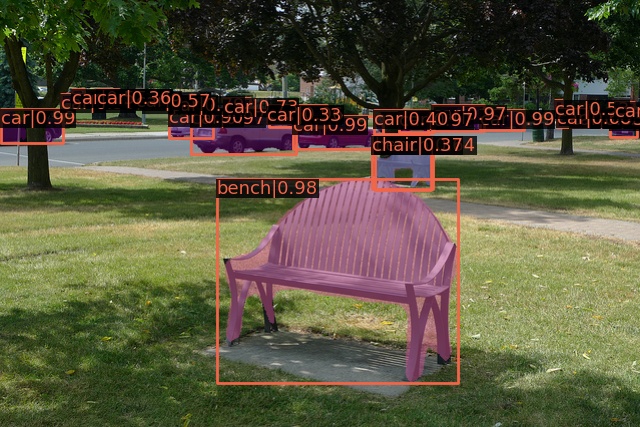
저장된 5000개의 이미지(COCO test, faster_rcnn) 중 하나를 가져와 보았다.
Test without Ground Truth Annotations
데이터셋 형식 변환
COCO 형식으로 변환하는 것을 기본으로 하는 것 같다.
다른 형식의 데이터셋은 다음 코드를 통해 COCO 형식으로 바꿀 수 있다.
python tools/dataset_converters/images2coco.py \
    ${IMG_PATH} \
    ${CLASSES} \
    ${OUT} \
    [--exclude-extensions]
파일 형식에 따라 다음 파일로 대체하면 된다.
- VOC: pascal_voc.py
- CityScapes: cityscapes.py
- Others: images2coco.py
변환을 완료했으면 다음 코드를 통해 GT annotation 없이 테스트를 해볼 수 있다.
# single-gpu testing
python tools/test.py \
    ${CONFIG_FILE} \
    ${CHECKPOINT_FILE} \
    --format-only \
    --options ${JSONFILE_PREFIX} \
    [--show]
1. Train predefined models on standard datasets
데이터셋 등은 위에서 설명한 대로 준비해 놓자.
학습하는 코드는 다음과 같다.
# single GPU
python tools/train.py \
    ${CONFIG_FILE} \
    [optional arguments]
# Multiple GPUs
bash ./tools/dist_train.sh \
    ${CONFIG_FILE} \
    ${GPU_NUM} \
    [optional arguments]

# 예시
python tools/train.py \
    configs/faster_rcnn/faster_rcnn_r50_fpn_2x_coco.py
    --work-dir work_dir_tutorial_2

bash ./tools/dist_train.sh
    configs/faster_rcnn/faster_rcnn_r50_fpn_2x_coco.py
    2
log 파일과 checkpoint는 work_dir/ 또는 --work-dir로 지정한 디렉토리에 생성된다.
config 파일만 지정하면 알아서 학습이 진행된다. 실행 환경 정보, 모델, optimizer, 평가방법 등 config 정보 등이 출력되며 학습이 시작된다.
기본적으로 evaluation을 매 epoch마다 진행하는데, 이는 추가 옵션으로 바꿀 수 있다.
- 1개의 Titan X로는 5일 7시간, 2개로는 3일 8시간 정도 소요된다고 나온다.
위에서 설명한 페이지 아래쪽에는 이외에도 여러 개의 job을 동시에 돌리는 법, Slurm으로 돌리는 방법 등이 공식 홈페이지에 있으니 쓸 생각이 있으면 참조하면 된다.
2: Train with customized datasets
다른 데이터셋을 가져와서 학습하는 방법을 설명하는데, 다음 단계를 따르면 된다.
- 사용할 데이터셋을 준비한다. annotation을 COCO format으로 변환하면 편하다.
- Config 파일을 수정한다.
- 준비한 데이터셋에서 학습과 추론을 진행한다.
여기서는 balloon dataset을 COCO format으로 변환한 다음 학습하는 방법을 설명한다.
Annotation 파일을 COCO format으로 변환
Balloon dataset의 annotation 파일은 대충 다음과 같이 생겼다.
{'base64_img_data': '',
 'file_attributes': {},
 'filename': '34020010494_e5cb88e1c4_k.jpg',
 'fileref': '',
 'regions': {'0': {'region_attributes': {},
   'shape_attributes': {'all_points_x': [1020,
     1000,
     994,
     ...
     1020],
    'all_points_y': [963,
     899,
     841,
     ...
     963],
    'name': 'polygon'}}},
 'size': 1115004}
COCO format은 다음과 같다.
 {
    "images": [image],
    "annotations": [annotation],
    "categories": [category]
}


image = {
    "id": int,
    "width": int,
    "height": int,
    "file_name": str,
}

annotation = {
    "id": int,
    "image_id": int,
    "category_id": int,
    "segmentation": RLE or [polygon],
    "area": float,
    "bbox": [x,y,width,height],
    "iscrowd": 0 or 1,
}

categories = [{
    "id": int,
    "name": str,
    "supercategory": str,
}]
그러니 Balloon dataset의 annotation 파일(json 파일)을 COCO format으로 변환하는 코드가 필요하다.
- 참고: 공식 홈페이지 코드에는 어째
import mmcv가 빠져 있다.
import os.path as osp
import mmcv

def convert_balloon_to_coco(ann_file, out_file, image_prefix):
    data_infos = mmcv.load(ann_file)

    annotations = []
    images = []
    obj_count = 0
    for idx, v in enumerate(mmcv.track_iter_progress(data_infos.values())):
        filename = v['filename']
        img_path = osp.join(image_prefix, filename)
        height, width = mmcv.imread(img_path).shape[:2]

        images.append(dict(
            id=idx,
            file_name=filename,
            height=height,
            width=width))

        bboxes = []
        labels = []
        masks = []
        for _, obj in v['regions'].items():
            assert not obj['region_attributes']
            obj = obj['shape_attributes']
            px = obj['all_points_x']
            py = obj['all_points_y']
            poly = [(x + 0.5, y + 0.5) for x, y in zip(px, py)]
            poly = [p for x in poly for p in x]

            x_min, y_min, x_max, y_max = (
                min(px), min(py), max(px), max(py))


            data_anno = dict(
                image_id=idx,
                id=obj_count,
                category_id=0,
                bbox=[x_min, y_min, x_max - x_min, y_max - y_min],
                area=(x_max - x_min) * (y_max - y_min),
                segmentation=[poly],
                iscrowd=0)
            annotations.append(data_anno)
            obj_count += 1

    coco_format_json = dict(
        images=images,
        annotations=annotations,
        categories=[{'id':0, 'name': 'balloon'}])
    mmcv.dump(coco_format_json, out_file)


convert_balloon_to_coco('train/via_region_data.json',
                        'train/annotation_coco.json',
                        'train')

convert_balloon_to_coco('val/via_region_data.json',
                        'val/annotation_coco.json',
                        'val')
위의 코드를 다음과 같이 놓고 실행하면 변환이 완료된다.
balloon
├── convert_annotations.py
├── train
│   ├── *.jpg
│   ├── via_region_data.json
│   ├── annotation_coco.json
├── val
│   ├── *.jpg
│   ├── via_region_data.json
│   ├── annotation_coco.json
결과:
root@0d813b2889d8:/mmdetection/data/balloon# python convert_annotation.py
[>>>>>>>>>>>>>>>>>>>>>>>>>>>>>>>>>>>>>>>>>>>>>>>>>>] 61/61, 49.4 task/s, elapsed: 1s, ETA:     0s
[>>>>>>>>>>>>>>>>>>>>>>>>>>>>>>>>>>>>>>>>>>>>>>>>>>] 13/13, 48.6 task/s, elapsed: 0s, ETA:     0s
Config 파일 준비
mmdetection/configs/balloon/ 디렉토리를 만들고 mask_rcnn_r50_caffe_fpn_mstrain-poly_1x_balloon.py 파일을 생성한다. Mask R-CNN with FPN 모델을 사용하기 때문에 이러한 이름을 가진다.
파일 내용은 다음과 같다.
# The new config inherits a base config to highlight the necessary modification
_base_ = '../mask_rcnn/mask_rcnn_r50_caffe_fpn_mstrain-poly_1x_coco.py'

# We also need to change the num_classes in head to match the dataset's annotation
model = dict(
    roi_head=dict(
        bbox_head=dict(num_classes=1),
        mask_head=dict(num_classes=1)))

# Modify dataset related settings
dataset_type = 'COCODataset'
classes = ('balloon',)
data = dict(
    train=dict(
        img_prefix='data/balloon/train/',
        classes=classes,
        ann_file='data/balloon/train/annotation_coco.json'),
    val=dict(
        img_prefix='data/balloon/val/',
        classes=classes,
        ann_file='data/balloon/val/annotation_coco.json'),
    test=dict(
        img_prefix='data/balloon/val/',
        classes=classes,
        ann_file='data/balloon/val/annotation_coco.json'))

# We can use the pre-trained Mask RCNN model to obtain higher performance
load_from = 'checkpoints/mask_rcnn_r50_caffe_fpn_mstrain-poly_3x_coco_bbox_mAP-0.408__segm_mAP-0.37_20200504_163245-42aa3d00.pth'
학습 및 추론하기
Checkpoint 파일을 받아서 checkpoints/ 안에 둔다.
현재 디렉토리 구조는 다음과 같다. 위치가 다르다면 경로를 수정해도 된다.
mmdetection
├── mmdet
├── tools
├── configs
│   ├── balloon
│   │   ├── mask_rcnn_r50_caffe_fpn_mstrain-poly_1x_balloon.py
│   ├── mask_rcnn
│   │   ├── mask_rcnn_r50_caffe_fpn_1x_coco.py
│   │   ├── mask_rcnn_r50_fpn_1x_coco.py'
│   │   ├── ...
├── checkpoints
│   ├── faster_rcnn_r50_fpn_1x_coco_20200130-047c8118.pth
│   ├── mask_rcnn_r50_caffe_fpn_mstrain-poly_3x_coco_bbox_mAP-0.408__segm_mAP-0.37_20200504_163245-42aa3d00.pth
├── data
│   ├── balloon
│   │   ├── convert_annotations.py
│   │   ├── train
│   │   │   ├── *.jpg
│   │   │   ├── annotation_coco.json
│   │   ├── val
│   │   │   ├── *.jpg
│   │   │   ├── annotation_coco.json
이제 학습을 진행하면 된다.
python tools/train.py configs/balloon/mask_rcnn_r50_caffe_fpn_mstrain-poly_1x_balloon.py
결과:
...
2021-09-03 06:37:20,209 - mmdet - INFO - Saving checkpoint at 12 epochs
2021-09-03 06:37:20,690 - mmdet - INFO - Exp name: mask_rcnn_r50_caffe_fpn_mstrain-poly_1x_balloon.py
2021-09-03 06:37:20,690 - mmdet - INFO - Epoch(val) [12][13]    bbox_mAP: 0.7080,
bbox_mAP_50: 0.8280, bbox_mAP_75: 0.7820, bbox_mAP_s: 0.2020, bbox_mAP_m: 0.4750,
bbox_mAP_l: 0.8110, bbox_mAP_copypaste: 0.708 0.828 0.782 0.202 0.475 0.811,
segm_mAP: 0.7460, segm_mAP_50: 0.8190, segm_mAP_75: 0.7740, segm_mAP_s: 0.4040,
segm_mAP_m: 0.4850, segm_mAP_l: 0.8350, segm_mAP_copypaste: 0.746 0.819 0.774 0.404 0.485 0.835
이제 work_dirs에는 다음과 같이 파일들이 생성되어 있다. 명령창에서 --work-dirs 옵션을 주었다면 해당 디렉토리로 들어가면 된다.
mmdetection
├── work_dirs
│   ├── mask_rcnn_r50_caffe_fpn_mstrain-poly_1x_balloon
│   │   ├── 20210903_061911.log
│   │   ├── ...
│   │   ├── 20210903_062541.log
│   │   ├── 20210903_063427.log.json
│   │   ├── epoch_1.pth
│   │   ├── epoch_2.pth
│   │   ├── ...
│   │   ├── epoch_12.pth
│   │   ├── latest.pth
│   │   ├── mask_rcnn_r50_caffe_fpn_mstrain-poly_1x_balloon.py
latest.pth 파일을 이용해서 테스트를 진행하려면 다음과 같이 입력한다.
python tools/test.py \
    configs/balloon/mask_rcnn_r50_caffe_fpn_mstrain-poly_1x_balloon.py \
    work_dirs/mask_rcnn_r50_caffe_fpn_mstrain-poly_1x_balloon/latest.pth \
    --eval bbox segm \
    --show-dir results/mask_rcnn_r50_caffe_fpn_mstrain-poly_1x_balloon
- 참고: 공식 코드에는 어째서인지 디렉토리 이름을
...balloon.py\latest.path로 적어 놨다… 대규모 프로젝트의 코드치고 자잘한 오류가 많다.
대략 다음과 같은 결과를 얻을 수 있다.
OrderedDict([
    ('bbox_mAP', 0.708), ('bbox_mAP_50', 0.828), ('bbox_mAP_75', 0.782),
    ('bbox_mAP_s', 0.202), ('bbox_mAP_m', 0.475), ('bbox_mAP_l', 0.811),
    ('bbox_mAP_copypaste', '0.708 0.828 0.782 0.202 0.475 0.811'), ('segm_mAP', 0.746),
    ('segm_mAP_50', 0.819), ('segm_mAP_75', 0.774), ('segm_mAP_s', 0.404),
    ('segm_mAP_m', 0.485), ('segm_mAP_l', 0.835),
    ('segm_mAP_copypaste', '0.746 0.819 0.774 0.404 0.485 0.835')
])
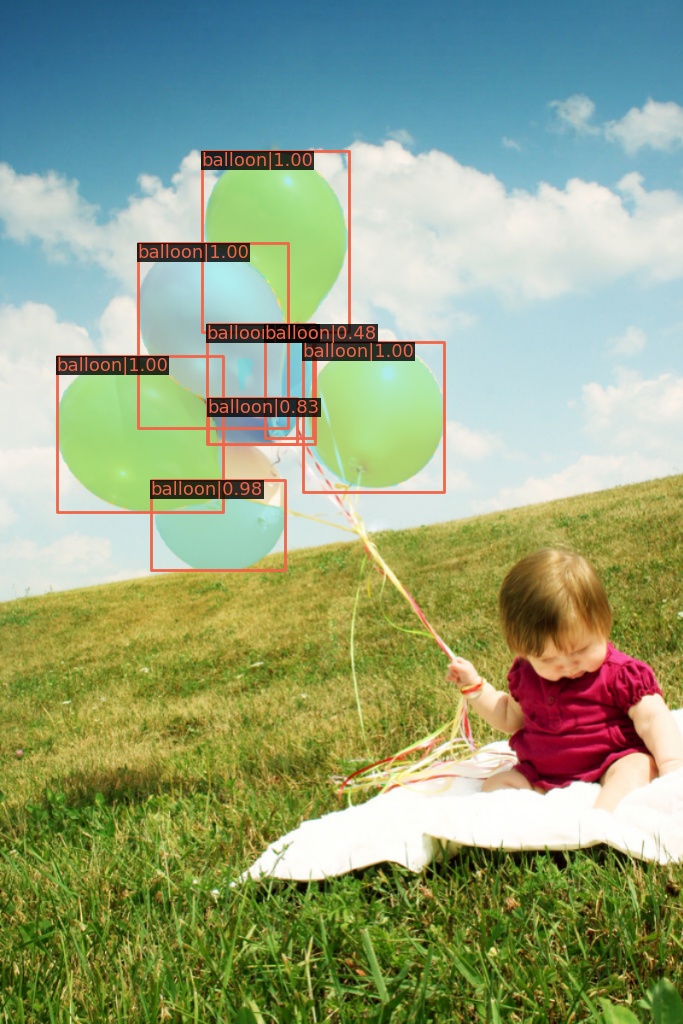
이제 mmdetection/results/mask_rcnn_r50_caffe_fpn_mstrain-poly_1x_balloon 디렉토리에 들어가보면 data/balloon/val 안에 있던 13개의 이미지에 대해 bbos를 친 결과를 확인할 수 있다.
3: Train with customized models and standard datasets
CityScapes와 같은 표준 데이터셋에 사용자 모델을 학습시키려면 다음 과정을 따른다.
- 표준 데이터셋을 준비한다.
- 사용자 모델을 준비한다.
- Config 파일을 생성한다.
- 표준 데이터셋에서 사용자 모델을 학습 및 추론한다.
CityScapes 데이터셋 준비
- 참고: 이 부분은 미구현된 부분이 있어서 그대로는 동작하지 않는다.
먼저 다운로드를 해야 한다. 학교 이메일 등으로만 회원가입이 된다(gmail 불가).
홈페이지에서 다음을 받으면 된다.
- leftImg8bit_trainvaltest.zip (11GB)
- gtFine_trainvaltest.zip (241MB)
참고로 annotations은 각각의 데이터셋 안에 들어 있으니 따로 추가로 받아야 할 것은 없다.
CityScapes는 위에서 설명했던 것과 같이 데이터셋은 다음과 같은 구조로 둔다.
mmdetection
├── mmdet
├── tools
├── configs
├── data
│   ├── coco
│   │   ├── annotations
│   │   ├── train2017
│   │   ├── val2017
│   │   ├── test2017
│   ├── cityscapes
│   │   ├── annotations
│   │   ├── leftImg8bit
│   │   │   ├── train
│   │   │   ├── val
│   │   ├── gtFine
│   │   │   ├── train
│   │   │   ├── val
│   ├── VOCdevkit
│   │   ├── VOC2007
│   │   ├── VOC2012
CityScapes류 데이터셋은 COCO format으로 변환하는 과정이 필요하다.
pip install cityscapesscripts
python tools/dataset_converters/cityscapes.py ./data/cityscapes --nproc 8 --out-dir ./data/cityscapes/annotations
그러면 간단히 변환이 완료된다.
Converting train into instancesonly_filtered_gtFine_train.json
Loaded 2975 images from ./data/cityscapes/leftImg8bit/train
Loading annotation images
[>>>>>>>>>>>>>>>>>>>>>>>>>>>>>>>>>>>>>>>>>>>>>>>>>>] 2975/2975, 30.1 task/s, elapsed: 99s, ETA:     0s
It took 100.40516328811646s to convert Cityscapes annotation
사용자 모델 준비
여기서는 Cascade Mask R-CNN R50 모델을 기반으로 하는 모델을 사용자 모델로 쓴다. 이 모델을 그대로 쓰는 것은 아니고 FPN을 AugFPN으로, training time auto augmentation으로 Rotate나 Translate를 추가하는 변형을 가한다.
새 파일 mmdet/models/necks/augfpn.py을 만든다.
from ..builder import NECKS

@NECKS.register_module()
class AugFPN(nn.Module):

    def __init__(self,
                in_channels,
                out_channels,
                num_outs,
                start_level=0,
                end_level=-1,
                add_extra_convs=False):
        pass

    def forward(self, inputs):
        # implementation is ignored
        pass
그리고 mmdet/models/necks/__init__.py 파일에 from .augfpn import AugFPN 코드를 추가하거나,
config 파일에 다음을 추가하면 된다.
custom_imports = dict(
    imports=['mmdet.models.necks.augfpn.py'],
    allow_failed_imports=False)
__init__.py 파일은 다음과 같이 생겼다.
사용자 모델을 설계하는 방법이나 학습 세팅에 대한 더 자세한 정보는 다음 링크를 참고하자.
Config 파일 준비
이제 configs/cityscapes/cascade_mask_rcnn_r50_augfpn_autoaug_10e_cityscapes.py 파일을 생성하자.
config 파일의 코드는 여기를 참조하자.
학습 및 추론
python tools/train.py configs/cityscapes/cascade_mask_rcnn_r50_augfpn_autoaug_10e_cityscapes.py
python tools/test.py configs/cityscapes/cascade_mask_rcnn_r50_augfpn_autoaug_10e_cityscapes.py work_dirs/cascade_mask_rcnn_r50_augfpn_autoaug_10e_cityscapes.py/latest.pth --eval bbox segm
Tutorials에 대한 설명은 다음 글에서..