
MMDetection 사용법 2(Tutorial)
05 Sep 2021 | Linux Ubuntu open-mmlab usage목차
- Tutorial 1: Learn about Configs
- Tutorial 2: Customize Datasets
- Tutorial 3: Customize Data Pipelines
- Tutorial 4: Customize Models
- Tutorial 5: Customize Runtime Settings
- Tutorial 7: Finetuning Models
이 글에서는 MMDetection를 사용하는 방법을 정리한다.
이전 글에서는 설치 및 Quick Run 부분을 다루었으니 참고하면 좋다.
Tutorial 1: Learn about Configs
이미 만들어져 있는 모델이나 표준 데이터셋만을 활용하고자 한다면, config 파일만 적당히 바꿔주면 다른 건 할 것 없이 바로 코드를 돌려볼 수 있다.
먼저 config 파일의 구조는 다음과 같다.
- 기본이 되는 config 파일이
configs/_base_/디렉토리에 있다. 해당 디렉토리는 dataset, model, schedule, default_runtime 총 4개로 구성되며 사용되는 config들은 이들을 base로 한다._base_안에 있는 config로만 구성된 config를 primitive라 한다. - 실제로 사용할 config는
_base_내의 기본 config 또는 다른 config를 상속받아 구성할 수 있다. 이를테면 하나의 primitive를 상속받은 뒤 적당한 수정을 가해서 사용하는 방식이다.- 만약 아예 새로운 config를 만들고 싶다면
configs/에다 새로운 디렉토리를 만들고 작성하면 된다.
- 만약 아예 새로운 config를 만들고 싶다면
config 디렉토리의 구조는 대략 다음과 같음을 기억하자.
mmdetection
├── configs
│   ├── _base_
│   │   ├── datasets
|   │   │   ├── coco_detection.py
|   │   │   ├── ...
│   │   ├── models
|   │   │   ├── faster_rcnn_r50_fpn.py
|   │   │   ├── ...
│   │   ├── schedules
|   │   │   ├── schedule_1x.py
|   │   │   ├── ...
│   │   ├── default_runtime.py
|   |
│   ├── faster_rcnn
|   │   ├── faster_rcnn_r50_fpn_1x_coco.py
|   │   ├── ...
│   ├── mask_rcnn
│   ├── ...
primitive의 한 예시는 configs/faster_rcnn/faster_rcnn_r50_fpn_1x_coco.py이다.
_base_ = [
    '../_base_/models/faster_rcnn_r50_fpn.py',
    '../_base_/datasets/coco_detection.py',
    '../_base_/schedules/schedule_1x.py', '../_base_/default_runtime.py'
]
이미 만들어진 위의 config configs/faster_rcnn/faster_rcnn_r50_fpn_1x_coco.py에다가 약간의 수정을 가한 config의 예시는 configs/faster_rcnn/faster_rcnn_r50_fpn_bounded_iou_1x_coco.py이다.
_base_ = './faster_rcnn_r50_fpn_1x_coco.py'
model = dict(
    roi_head=dict(
        bbox_head=dict(
            reg_decoded_bbox=True,
            loss_bbox=dict(type='BoundedIoULoss', loss_weight=10.0))))
이 config는 BoundedIoULoss를 사용하는 것을 제외하면 faster_rcnn_r50_fpn_1x_coco와 완전히 같은 모델이다. _base_에서 모든 설정을 가져온 뒤, 아래에 있는 부분만 덮어씌워진다.
이처럼 이미 있는 모델 config에다가 약간만 수정해서 갖다쓰면 되는 간단한 방식이다.
참고로 tools/train.py나 tools/test.py를 실행시킬 때 --cfg-options 옵션으로 추가로 지정할 수 있다.
config 작명 방법
이름이 faster_rcnn_r50_fpn_1x_coco와 같이 꽤 긴 것을 볼 수 있다. 많은 정보를 담고 있는데, 일반적인 형식은 다음과 같다.
{model}_[model setting]_{backbone}_{neck}_[norm setting]_[misc]_[gpu x batch_per_gpu]_{schedule}_{dataset}
{중괄호}는 필수, [대괄호]는 선택이다.
{model}: faster_rcnn와 같은 모델 이름이다.{model setting}: 일부 모델에 대한 세부 설정인데htc의 경우without_semantic,reppoints의 경우moment등이다.{backbone}: 모델의 전신이 되는 기본 모델로r50(ResNet-50),x101(ResNeXt-101) 등이다.{neck}: 모델의 neck에 해당하는 부분을 정하는 것으로fpn,pafpn,nasfpn,c4등이 있다.{norm_setting}: 기본값은bn으로 batch normalization이며 생략이 가능하다.gn은 Group Normalization,syncbn은 Synchronized BN,gn-head및gn-neck은 GN을 head 또는 neck에만 적용,gn-all은 모델의 전체(backbone, nect, head)에다가 GN을 적용한다.[misc]: 이모저모를 적자.dconv,gcb,attention,albu,mstrain등이다.[gpu x batch_per_gpu]: GPU 개수와 GPU 당 sample 개수로8x2가 기본이다.{schedule}:1x는 12epoch,2x는 24epoch이며 8/16번째와 11/22번째 epoch에서 lr이 10분의 1이 된다.20e는 cascade 모델에서 사용되는 것으로 20epoch으로 10분의 1이 되는 시점은 16/19번째이다.{dataset}: 데이터셋을 나타내는 부분으로coco,cityscapes,voc_0712,wider_face등이다.
config 파일 예시
_base_ 내의 Faster R-CNN config 파일은 다음과 같이 생겼다.
# model settings
model = dict(
    type='FasterRCNN',
    pretrained='torchvision://resnet50',
    backbone=dict(
        type='ResNet',
        depth=50,
        num_stages=4,
        out_indices=(0, 1, 2, 3),
        frozen_stages=1,
        norm_cfg=dict(type='BN', requires_grad=True),
        norm_eval=True,
        style='pytorch'),
    neck=dict(
        type='FPN',
        in_channels=[256, 512, 1024, 2048],
        out_channels=256,
        num_outs=5),
    rpn_head=dict(
        type='RPNHead',
        ...
        ),
    roi_head=dict(
        type='StandardRoIHead',
        ...
        ),
    # model training and testing settings
    train_cfg=dict(
        rpn=dict(...),
        rpn_proposal=dict(...),
        rcnn=dict(...),
    test_cfg=dict(
        rpn=dict...),
        rcnn=dict(...)
        # soft-nms is also supported for rcnn testing
        # e.g., nms=dict(type='soft_nms', iou_threshold=0.5, min_score=0.05)
    ))
대충 살펴보면,
- type: Faster RCNN 모델이다.
- pretrained: torchvision의 pretrained model 중 resnet50을 가져온다.
- backbone: backbone 모델의 세부를 결정하는데, 이 경우 50 layer짜리 resnet으로 BN을 사용한다.
- neck: backbone 모델과 head를 잇는 부분이다. 여기서는
FPN을 사용하였으며 채널 수 등이 정의되어 있다. - head:
rpn head와roi head가 사용된다. - train_cfg, test_cfg: iou threshold, 이미지 개수 등 세부를 조절한다. 참고로 위의 코드처럼 model config안에 넣어야 한다. config file 제일 바깥에 쓰는 방법은 deprecated된 상태이다.
Tutorial 2: Customize Datasets
표준 데이터셋 이외에 다른 데이터셋을 사용하려면 먼저 COCO format이나 middle format으로 변환해야 한다.
추천하는 방법은 학습 중에 하는(online) 방법 대신 미리(offline) COCO format으로 변환하는 것이라고 한다.
COCO format으로 변환
COCO 기준 데이터는 다음과 같이 구성하면 된다.
mmdetection
├── configs
├── data
│   ├── coco
│   │   ├── annotations
|   │   │   ├── captions_train2017.json
|   │   │   ├── ...
│   │   ├── train2017
|   │   │   ├── 000000000009.jpg
|   │   │   ├── ...
│   │   ├── val2017
|   │   │   ├── 000000000139.jpg
|   │   │   ├── ...
│   │   ├── test2017
|   │   │   ├── 000000000001.jpg
|   │   │   ├── ...
...
annotation 형식이 중요한데, COCO format은 다음과 같다.
'images': [
    {
        'file_name': 'COCO_val2014_000000001268.jpg',
        'height': 427,
        'width': 640,
        'id': 1268
    },
    ...
],

'annotations': [
    {
        'segmentation': [[192.81,
            247.09,
            ...
            219.03,
            249.06]],  # if you have mask labels
        'area': 1035.749,
        'iscrowd': 0,
        'image_id': 1268,
        'bbox': [192.81, 224.8, 74.73, 33.43],
        'category_id': 16,
        'id': 42986
    },
    ...
],

'categories': [
    {'id': 0, 'name': 'car'},
    ...
]
필수로 포함되어야 하는 부분은 다음 3가지다.
images: 이미지 파일에 대한 기본정보를 나타내는 list로file_name,height,width,id등이 들어간다.annotations: 각 이미지 파일에 대한 annotation 정보의 list이다.categories: 카테고리name과 그id가 포함된 list 형태이다.
각 부분 내에서 세부적인 내용은 조금씩 다를 수 있다.
Customized dataset 사용을 위한 config 파일 수정
사용자 지정 config 파일을 configs/my_custom_config.py라 하면 다음 두 부분을 수정해야 한다.
data.train,data.val,data.test에 있는classes에 명시적으로 추가해야 한다.model부분에서num_classes를 덮어씌운다. COCO는 80으로 되어 있다. 데이터셋마다 class의 개수가 다를 텐데 이를 지정해야 한다.
뭐 다음과 같은 식이다. base인 cascade_mask_rcnn_r50_fpn_1x_coco에다가 데이터셋 정보만 업데이트한 것이다.
# the new config inherits the base configs to highlight the necessary modification
_base_ = './cascade_mask_rcnn_r50_fpn_1x_coco.py'

# 1. dataset settings
dataset_type = 'CocoDataset'
classes = ('a', 'b', 'c', 'd', 'e')
data = dict(
    samples_per_gpu=2,
    workers_per_gpu=2,
    train=dict(
        type=dataset_type,
        # explicitly add your class names to the field `classes`
        classes=classes,
        ann_file='path/to/your/train/annotation_data',
        img_prefix='path/to/your/train/image_data'),
    val=dict(
        type=dataset_type,
        # explicitly add your class names to the field `classes`
        classes=classes,
        ann_file='path/to/your/val/annotation_data',
        img_prefix='path/to/your/val/image_data'),
    test=dict(
        type=dataset_type,
        # explicitly add your class names to the field `classes`
        classes=classes,
        ann_file='path/to/your/test/annotation_data',
        img_prefix='path/to/your/test/image_data'))

# 2. model settings

# explicitly over-write all the `num_classes` field from default 80 to 5.
model = dict(
    roi_head=dict(
        bbox_head=[
            dict(
                type='Shared2FCBBoxHead',
                # explicitly over-write all the `num_classes` field from default 80 to 5.
                num_classes=5),
            dict(
                type='Shared2FCBBoxHead',
                # explicitly over-write all the `num_classes` field from default 80 to 5.
                num_classes=5),
            dict(
                type='Shared2FCBBoxHead',
                # explicitly over-write all the `num_classes` field from default 80 to 5.
                num_classes=5)],
    # explicitly over-write all the `num_classes` field from default 80 to 5.
    mask_head=dict(num_classes=5)))
유효성 확인
config 파일에는 classes 필드가 있고(위 코드에서 확인), annotation 파일에는 images, annotations, categories 필드가 있음을 기억하자.
- annotation 파일의
categories의 길이는 config 파일의classestuple의 길이와 같아야 한다.- 위의 예시의 경우
classes = ('a', 'b', 'c', 'd', 'e')이므로 5여야 한다.
- 위의 예시의 경우
- annotation 파일의
categories안의name는 config 파일의classestuple의 요소와 순서 및 이름이 정확히 일치해야 한다.- MMDetection은
categories의 빠진id를 자동으로 채우므로name의 순서는 label indices의 순서에 영향을 미친다. classes의 순서는 bbox의 시각화에서 label text에 영향을 준다.
- MMDetection은
- annotation 파일의
annotations안category_id는 유효해야 한다. 즉,category_id의 모든 값은categories안의id중에 있어야 한다.
Middle format으로 변환
Middle format은 모든 데이터셋이 호환되는 간단한 형식으로 COCO format이 싫다면 middle format으로 변환하면 된다.
annotation은 dict의 list로 구성되며 각 dict는 하나의 이미지와 대응된다.
- 각 dict는
filename(상대경로),width,height, - 그리고 추가 필드인
ann(annotation)으로 구성된다.ann은 2개의 부분으로 구성되는데,bboxes: np.ndarray 형식으로 크기는 (n, 4)이다.labels: np.ndarray 형식으로 크기는 (n, )이다.- 일부 데이터셋은 crowd/difficult/ignored bboxes로 구분하는데, 여기서는 이를 위해
bboxes_ignore와labels_ignore를 제공한다.
예시는 다음과 같다.
[
    {
        'filename': 'a.jpg',
        'width': 1280,
        'height': 720,
        'ann': {
            'bboxes': <np.ndarray, float32> (n, 4),
            'labels': <np.ndarray, int64> (n, ),
            'bboxes_ignore': <np.ndarray, float32> (k, 4), (optional field)
            'labels_ignore': <np.ndarray, int64> (k, )     (optional field)
        }
    },
    ...
]
Custom dataset을 사용하려면 다음 두 가지 방법 중 하나를 쓰면 된다.
- online conversion
- CustomDataset을 상속받아 구현하면 된다. CocoDataset나 VOCDataset처럼 하면 된다.
- 다음 두 method를 overwrite하면 된다.
load_annotations(self, ann_file)get_ann_info(self, idx)
- offline conversion
- pascal_voc.py처럼 annotation format을 위의 middle format으로 바꾸는 코드를 짜면 된다.
- 그리고
CustomDataset을 사용하면 끝이다.
Dataset Wrappers
RepeatDataset: 전체 데이터셋을 단순 반복한다.ClassBalancedDatasetclass별로 비중을 (비슷하게) 맞춰서 데이터셋을 반복한다.ConcatDataset: 데이터셋들을 이어붙여서 사용한다.
Modify Dataset Classes
데이터셋 중 일부 class만 사용하고 싶을 때 다음과 같이 쓰면 지정한 class만 사용하게 된다.
classes = ('person', 'bicycle', 'car')
data = dict(
    train=dict(classes=classes),
    val=dict(classes=classes),
    test=dict(classes=classes))
혹은, classes.txt란 파일이 다음과 같다고 하자.
person
bicycle
car
그러면 다음과 같이 써도 된다.
classes = 'path/to/classes.txt'
data = dict(
    train=dict(classes=classes),
    val=dict(classes=classes),
    test=dict(classes=classes))
Tutorial 3: Customize Data Pipelines
데이터 처리 과정은 아래처럼 여러 개의 과정으로 분해할 수 있다.
크게 다음 순서로 생각해 볼 수 있다.
- Data loading
- Pre-processing
- Formatting
- Test-time augmentation
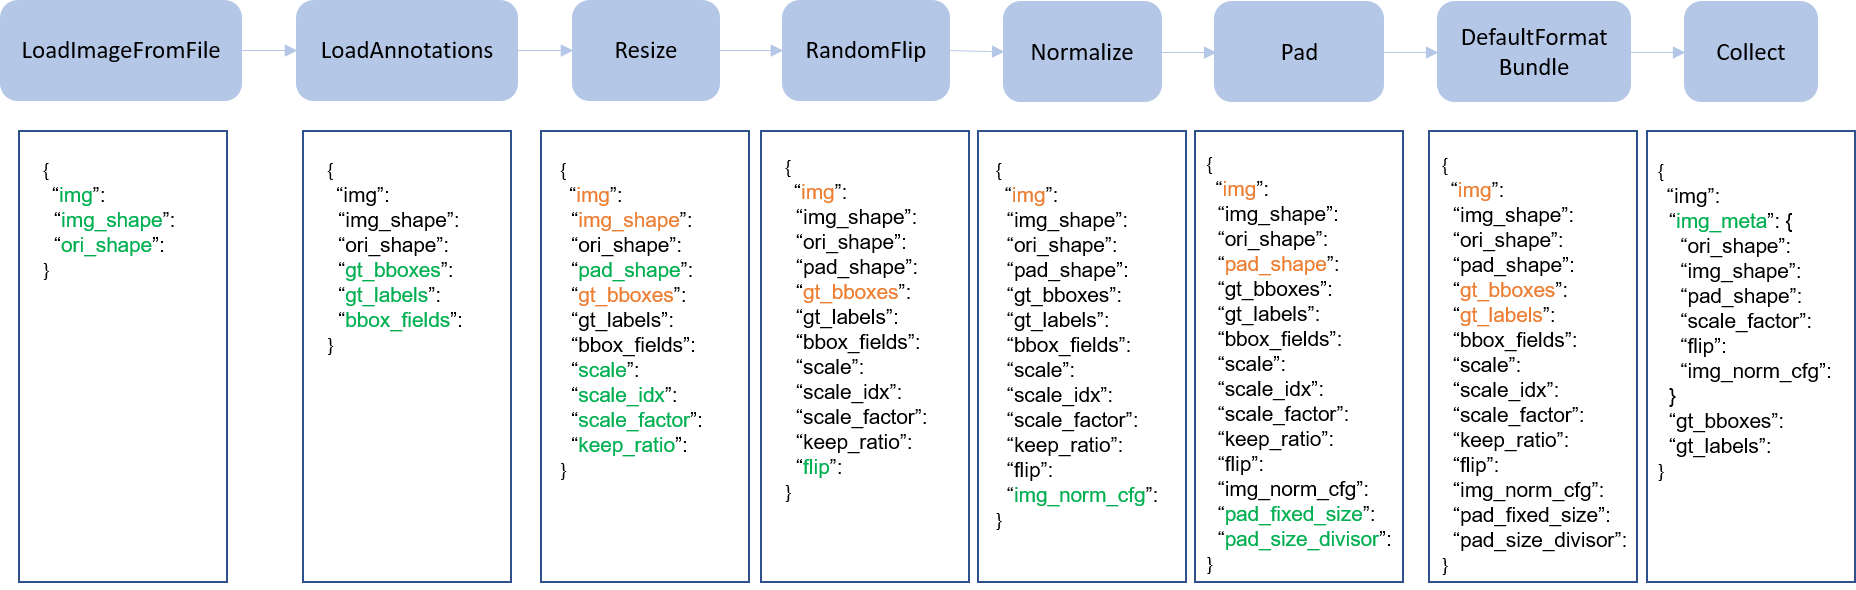
img_norm_cfg = dict(
    mean=[123.675, 116.28, 103.53], std=[58.395, 57.12, 57.375], to_rgb=True)
train_pipeline = [
    dict(type='LoadImageFromFile'),
    dict(type='LoadAnnotations', with_bbox=True),
    dict(type='Resize', img_scale=(1333, 800), keep_ratio=True),
    dict(type='RandomFlip', flip_ratio=0.5),
    dict(type='Normalize', **img_norm_cfg),
    dict(type='Pad', size_divisor=32),
    dict(type='MyTransform'),
    dict(type='DefaultFormatBundle'),
    dict(type='Collect', keys=['img', 'gt_bboxes', 'gt_labels']),
]
위처럼 다양한 변형 과정을 순차적으로 진행하게 할 수 있다. 자세한 내용은 공식 문서 참조..
Tutorial 4: Customize Models
MMDetection의 모델은 크게 다섯 부분으로 나누어진다.
- Backbone: feature map을 추출하는 중심 네트워크로 보통 FCN net이다. ResNet, MobileNet 등
- Neck: backbone과 head를 연결하는 부분으로 FPN이나 PAFPN 등이 있다.
- Head: bbox prediction이나 mask prediction 등 특정 task를 수행하는 부분이다.
- RoI extractor: RoI Align과 같이 feature map으로부터 RoI feature를 추출하는 부분이다.
- Loss: Head에서 손실함수를 계산하는 부분이다. FocalLoss, L1Loss, GHMLoss 등
사용자 backbone 만들기
3개의 과정을 거치면 된다.
mmdet/models/backbones/에 새 파일을 만든다. 공식 홈페이지 예시대로mobilenet.py를 만들어보자.
import torch.nn as nn
from ..builder import BACKBONES

@BACKBONES.register_module()
class MobileNet(nn.Module):

    def __init__(self, arg1, arg2):
        pass

    def forward(self, x):  # should return a tuple
        pass
    # 구현하는 방법은 이미 구현되어 있는 다른 파일들을 보는 것도 도움이 된다.(그러나 보통 복잡함)
mmdet/models/backbones/__init__.py에다가 import문을 추가하거나,
사용할 config 파일에 다음 코드를 추가한다.
custom_imports = dict(
    imports=['mmdet.models.backbones.mobilenet'],
    allow_failed_imports=False)
- config 파일에서 방금 만든 backbone을 사용하면 끝!
model = dict(
    ...
    backbone=dict(
        type='MobileNet',
        arg1=xxx,
        arg2=xxx),
    ...
사용자 neck 만들기
backbone 만드는 것과 매우 비슷하다.
mmdet/models/necks/ 디렉토리에 pafpn.py와 같이 파일을 만들고,
from ..builder import NECKS

@NECKS.register_module()
class PAFPN(nn.Module):

    def __init__(self,
                in_channels,
                out_channels,
                num_outs,
                start_level=0,
                end_level=-1,
                add_extra_convs=False):
        pass

    def forward(self, inputs):
        # implementation is ignored
        pass
mmdet/models/necks/__init__.py에
from .pafpn import PAFPN
을 추가하거나 config 파일에
custom_imports = dict(
    imports=['mmdet.models.necks.pafpn.py'],
    allow_failed_imports=False)
를 추가한다.
다음 config 파일에
neck=dict(
    type='PAFPN',
    in_channels=[256, 512, 1024, 2048],
    out_channels=256,
    num_outs=5)
로 사용하면 끝이다.
사용자 head, RoI head, Loss 만들기
mmdet/models/roi_heads/bbox_heads/, mmdet/models/bbox_heads/ 혹은 mmdet/models/losses/에다가 파일을 만들고 비슷하게 작업하면 된다.
import문을 추가해야 하는 파일은 mmdet/models/bbox_heads/__init__.py, mmdet/models/roi_heads/__init__.py 혹은 mmdet/models/losses/__init__.py이다.
config 파일에다가는 다음을 추가하면 된다.
custom_imports=dict(
    imports=['mmdet.models.roi_heads.double_roi_head',
            'mmdet.models.bbox_heads.double_bbox_head',
            'mmdet.models.losses.my_loss'])
loss의 사용은 다음과 같다.
loss_bbox=dict(type='MyLoss', loss_weight=1.0))
Tutorial 5: Customize Runtime Settings
Optimizer를 변경하려면 config 파일에서 그냥 바꿔주면 된다.
optimizer = dict(type='Adam', lr=0.0003, weight_decay=0.0001)
# or
optimizer = dict(type='MyOptimizer', a=a_value, b=b_value, c=c_value)
사용자 Opitimizer를 추가하려면 우선 mmdet/core/optimizer/my_optimizer.py와 같이 파일을 만들고,
from .registry import OPTIMIZERS
from torch.optim import Optimizer


@OPTIMIZERS.register_module()
class MyOptimizer(Optimizer):

    def __init__(self, a, b, c)
다른 모듈을 추가할 때처럼 mmdet/core/optimizer/__init__.py에다가 import문을 추가하거나
from .my_optimizer import MyOptimizer
config 파일에 다음을 추가한다.
custom_imports = dict(imports=['mmdet.core.optimizer.my_optimizer'], allow_failed_imports=False)
여기까지 읽어 보았다면 무언가 사용자 모듈과 같은 것을 추가할 때는
- 기존 것을 상속받은 다음 구현하고
__init__.py혹은 config 파일에 import문을 추가하고- config 파일에 custom_imports문을 추가하거나 사용자 모듈을 추가하는 과정
을 거치면 된다. 거의 모든 과정이 비슷하다.
- weight decay for BatchNorm layers와 같은 trick(?)을 사용하기 위해서는 optimizer constructor를 구현해야 한다. 공식 문서 참조.
Tutorial 7: Finetuning Models
Tutorial 6은 Loss를 만드는 부분인데 생략하였다.
COCO 데이터셋에서 사전학습된 detector들은 다른 데이터셋에서 미세조정하기 전 괜찮은 사전학습 모델로 사용할 수 있다.
이를 위해서는 다음 과정을 거쳐야 한다.
Tutorial 2에서와 같이 사용자 데이터셋 준비
위 과정을 따라하면 된다.
config 상속
config 항목에서와 같이 기본 모델, dataset config, runtime setting config를 상속받으면 된다. 아래는 cityscapes 데이터셋을 예시로 한 것이다.
_base_ = [
    '../_base_/models/mask_rcnn_r50_fpn.py',
    '../_base_/datasets/cityscapes_instance.py', '../_base_/default_runtime.py'
]
head 수정
그리고 config 파일에서 num_classes 항목을 새 데이터셋의 class 개수로 맞춰 준다.
training schedule 수정
미세조정 hyperparameter는 기본값과 많이 다를 수 있다. 보통 작은 lr와 더 적은 epoch을 쓴다.
# optimizer
# lr is set for a batch size of 8
optimizer = dict(type='SGD', lr=0.01, momentum=0.9, weight_decay=0.0001)
optimizer_config = dict(grad_clip=None)
# learning policy
lr_config = dict(
    policy='step',
    warmup='linear',
    warmup_iters=500,
    warmup_ratio=0.001,
    step=[7])
# the max_epochs and step in lr_config need specifically tuned for the customized dataset
runner = dict(max_epochs=8)
log_config = dict(interval=100)
사전학습 모델 사용
동적으로 사전학습된 model checkpoint를 가져올 수도 있지만, 미리 다운로드하는 것을 좀 더 추천한다고 한다.
load_from = 'https://download.openmmlab.com/mmdetection/v2.0/mask_rcnn/mask_rcnn_r50_caffe_fpn_mstrain-poly_3x_coco/mask_rcnn_r50_caffe_fpn_mstrain-poly_3x_coco_bbox_mAP-0.408__segm_mAP-0.37_20200504_163245-42aa3d00.pth' # noqa
faster_rcnn_r50_fpn_1x_coco의 경우 아래 링크에서 받을 수 있다.
faster rcnn의 다른 버전은 github에서 확인하자.
다른 모델들은 여기에서 config 및 checkpoint 파일, log를 확인할 수 있다.